Printing
Everything about selecting, starting, monitoring, and tuning your prints.
Selecting a File
Section titled “Selecting a File”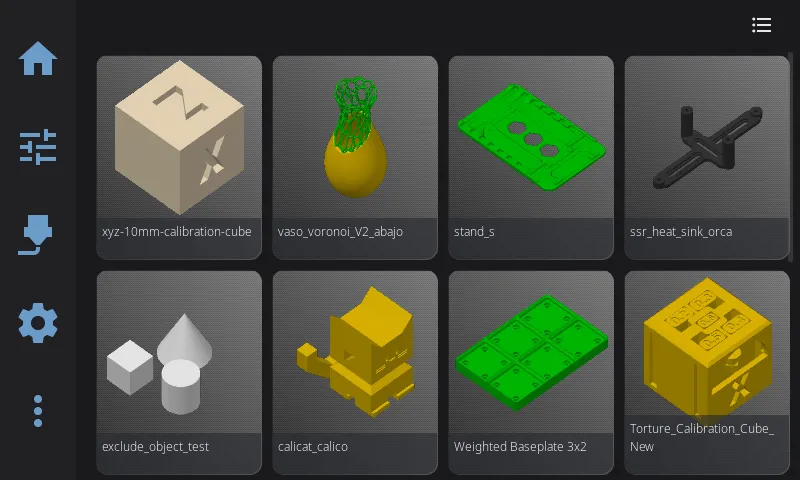
- From the Home panel, tap the print file area (shows “Select a file” when idle)
- Browse your G-code files from Moonraker’s virtual SD card
File source tabs:
If your printer exposes a USB drive, the top-left of the panel shows Printer and USB tabs. Tap a tab to switch which storage the file browser lists — Printer shows files on the printer’s storage (Moonraker’s virtual SD card), USB shows files on the attached USB drive. The tabs only appear when more than one source is available.
View options:
- Card View (default): Thumbnails with file info — estimated time, filament usage, slicer
- List View: Compact view for browsing many files (toggle with the grid icon in top-right)
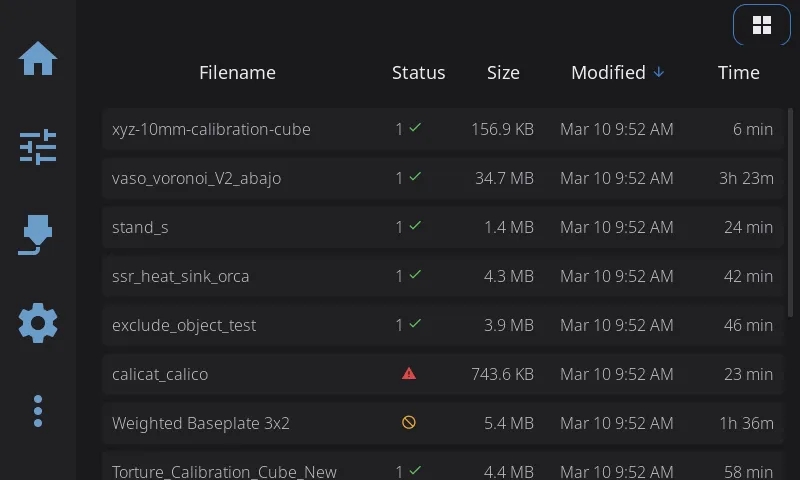
List view shows filename, print status, file size, modification date, and estimated print time in a sortable table. Tap any column header to sort.
Sorting options (tap the sort button):
- Name (A-Z or Z-A)
- Modified date (newest or oldest first)
- Size (largest or smallest)
- Print time (longest or shortest)
Sending Prints from OrcaSlicer
Section titled “Sending Prints from OrcaSlicer”Files you slice in OrcaSlicer can be sent straight to your printer over the network, where they show up in the file browser above — no USB stick or web upload needed. OrcaSlicer 2.4.0 or newer added a native Klipper/Moonraker connection that makes this work out of the box; HelixScreen needs nothing configured on its side.
In OrcaSlicer:
- Open Printer Settings (the gear next to your printer profile) → Connection (or the printer/network icon in the device area).
- Set the host type to Moonraker (Klipper).
- Enter your printer’s address — the same IP or hostname your printer’s web interface (Mainsail/Fluidd) uses, e.g.
http://192.168.1.50orhttp://myprinter.local. - API key (only if your Moonraker requires one): paste the key from your Moonraker config. Most home setups can leave this blank.
- Click Test — OrcaSlicer confirms it can reach the printer.
Once connected, OrcaSlicer’s Print button uploads the sliced file and (optionally) starts it. The file appears in HelixScreen’s file browser like any other, and you can also start it from the touchscreen.
Older OrcaSlicer (2.3.x): the native Moonraker option isn’t available. Either upgrade to 2.4.0+, use the older Octo (Klipper) host type, or just export the G-code and copy it through Mainsail/Fluidd.
Filament presets come along for the ride: if your AMS slots are configured in HelixScreen, OrcaSlicer pre-selects matching filament presets automatically — see the Filament guide.
File Preview
Section titled “File Preview”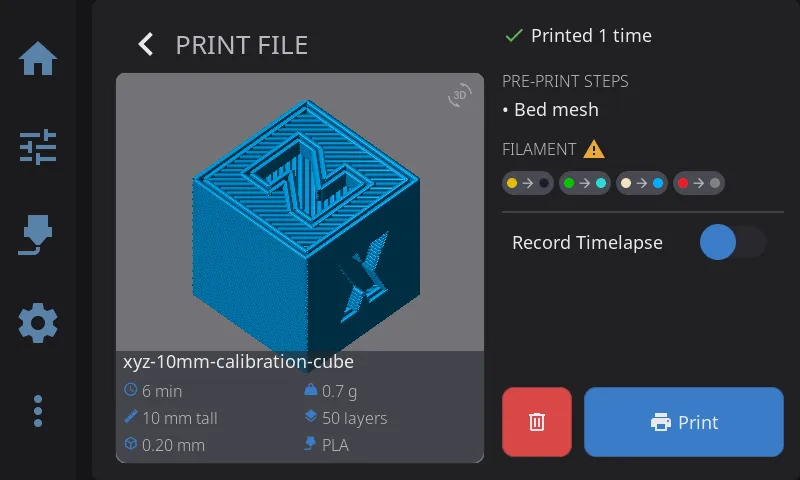
Tap a file to see the preview panel:
- 3D G-code preview: Rotatable with touch, showing the toolpath
- Metadata: Estimated time, filament weight, layer count, material, and layer height
- Pre-print steps: Shows which calibration steps will run before printing (e.g., bed mesh)
- Timelapse toggle: Enable recording if you have the timelapse plugin installed
Pre-Print Options
Section titled “Pre-Print Options”Before starting, you can enable or disable:
| Option | What It Does |
|---|---|
| Auto bed level | Run bed mesh calibration before print |
| Quad gantry level | Run QGL calibration (for gantry printers) |
| Z-tilt adjust | Run Z-tilt calibration |
| Nozzle clean | Execute your cleaning macro |
These options modify the G-code on-the-fly — if you disable “Auto bed level” but your G-code contains BED_MESH_CALIBRATE, HelixScreen comments it out so it doesn’t run.
Tip: Pre-print options remember your preferences per slicer. If you always run bed mesh before PrusaSlicer prints, that preference persists.
Starting a Print
Section titled “Starting a Print”- Select your file
- Review and set pre-print options
- Tap Start Print
The UI switches to the Print Status panel automatically.
During a Print
Section titled “During a Print”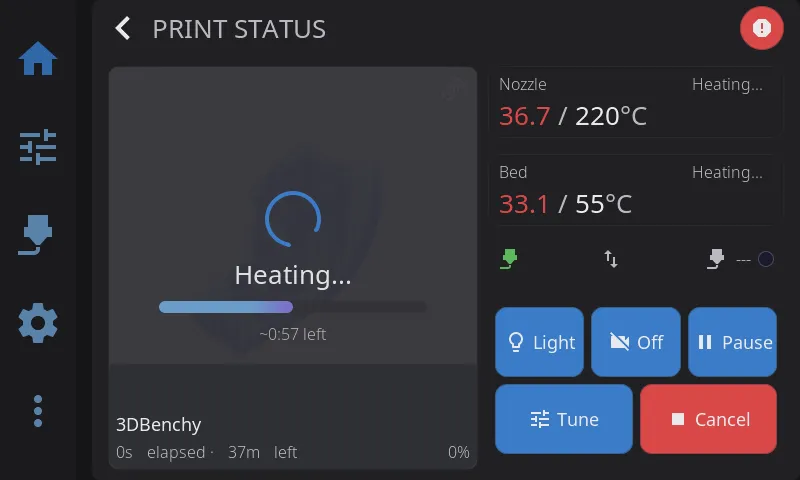
The Print Status panel shows:
- Circular progress indicator with percentage
- Time elapsed and time remaining
- Current layer / total layers
- Filament used — live consumption updated during printing
- Filename and thumbnail
Print controls:
| Button | Action |
|---|---|
| Light | Toggles the printer’s LED/case light. Only appears when HelixScreen has a controllable light configured. |
| Pause | Parks nozzle safely, pauses print |
| Resume | Continues from paused state |
| Cancel | Stops print (confirmation required). By default, waits for the printer’s cancel routine to finish. If Cancel Escalation is enabled in Settings > Safety & Notifications, an emergency stop triggers automatically after the configured timeout. |
| Tune | Opens Print Tune overlay for real-time adjustments |
View Toggle (Progress / Complete)
Section titled “View Toggle (Progress / Complete)”When the G-code viewer is active during a print, a small floating button appears in the top-left corner. Tap it to switch between:
- Progress view (default): Shows layers printed so far in solid color with a faded “ghost” preview of unprinted layers above.
- Complete view: Shows the entire finished object with all layers solid — useful for seeing what the final print will look like.
The icon shows a cube (tap to see the complete model) or stacked layers (tap to return to progress view). The toggle resets automatically when a new print starts.
If the print contains multiple objects, an objects list button also appears in that corner; the view toggle shifts to the right to make room.
Timelapse Toggle
Section titled “Timelapse Toggle”If the Moonraker-Timelapse plugin is installed, a timelapse button appears in the print controls. Tap it to enable or disable recording for the current print. The button shows a camera icon and toggles between “On” and “Off” states.
During printing, frame captures happen automatically based on your timelapse settings (per-layer or time-based). When the print finishes, the video renders automatically if auto-render is enabled.
Print Tune Overlay
Section titled “Print Tune Overlay”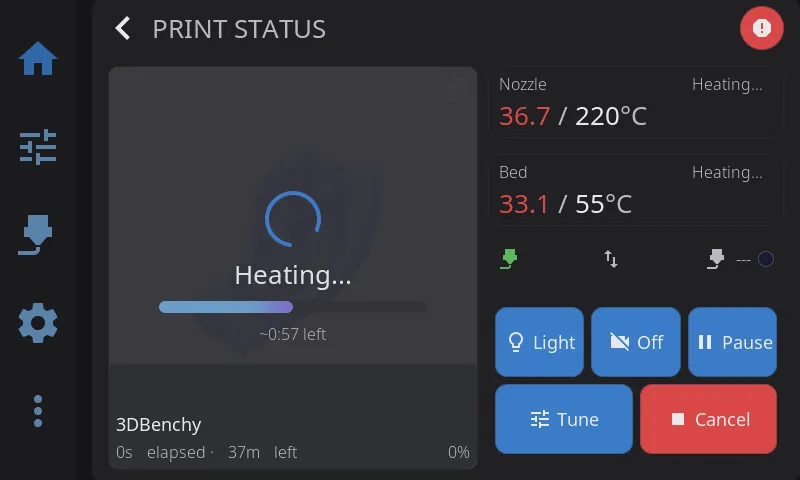
Access by tapping Tune during an active print.
| Parameter | Range | What It Does |
|---|---|---|
| Speed % | 50-200% | Overall print speed multiplier |
| Flow % | 75-125% | Extrusion rate multiplier |
The overlay also includes Z-Offset / baby-step controls (see below).
When to adjust:
- Speed %: Slow down (60-80%) for intricate details or if you see layer separation. Speed up for large infill areas.
- Flow %: Increase (105-110%) if you see gaps between extrusion lines. Decrease (95-98%) for blobs or over-packed lines.
Note: Tune adjustments are temporary and only affect the current print. The next print uses your slicer’s original values.
Fan speed: Part cooling fan speed is not adjusted from the Tune overlay. Current fan speeds are shown on the Print Status panel; tap that fan row to open the separate fan control overlay.
Z-Offset / Baby Steps
Section titled “Z-Offset / Baby Steps”Fine-tune your first layer height while printing:
Adjustment increments:
- -0.05mm / -0.01mm: Nozzle closer to bed (more squish)
- +0.01mm / +0.05mm: Nozzle further from bed (less squish)
Signs you need to adjust:
| Symptom | Problem | Fix |
|---|---|---|
| Lines not sticking, curling up | Nozzle too high | Tap -0.01 or -0.05 |
| Rough first layer, scratching sounds | Nozzle too low | Tap +0.01 or +0.05 |
| Gaps between lines | Nozzle too high | Tap -0.01 |
| Elephant foot, ridges | Nozzle too low | Tap +0.01 or +0.05 |
Saving your Z-Offset:
- Get the first layer looking good
- Tap Save Z-Offset to write to Klipper config
- Future prints use this as the starting point
Tip: Make small adjustments (0.01mm) and wait for the printer to complete a few moves before judging the result.
Exclude Object
Section titled “Exclude Object”If your slicer supports object labels (OrcaSlicer, SuperSlicer):
- Tap Exclude Object during a print
- See a list of printable objects
- Select an object to skip (e.g., a failed part)
- Undo is available for 5 seconds after exclusion
This lets you salvage a print when one object fails without canceling the entire job.
After a Print
Section titled “After a Print”When a print completes, a completion modal appears showing:
- Total print time and slicer estimate comparison
- Layers printed (current / total)
- Filament consumed (formatted as mm, meters, or km)
- Notification sound plays (if enabled in Sound Settings)
- Print is logged to history
Once a print has finished — whether it completed, was cancelled, or failed — a Reprint button replaces the Cancel button in the print controls. Tap it to start the same file again without browsing back to it.
See Also
Section titled “See Also”- Calibration & Tuning — Bed mesh, input shaper, and Z-offset affect print quality
- Advanced Features — G-code console for manual commands during printing
- Temperature Control — Detailed temperature management and presets
Next: Temperature Control | Prev: Home Panel | Back to User Guide