Getting Started
Welcome to HelixScreen — a modern touchscreen interface for Klipper 3D printers. It connects to your printer via Moonraker and provides intuitive controls for printing, temperature management, calibration, and more.
Quick Reference
Section titled “Quick Reference”| Sidebar Icon | Panel | What You’ll Do There |
|---|---|---|
| Home | Home | Monitor status, start prints, view temperatures |
| Tune | Controls | Move axes, set temperatures, control fans |
| Spool | Filament | Load/unload filament, manage AMS slots |
| Gear | Settings | Configure display, sound, network, sensors |
| More | Advanced | Calibration, history, macros, system tools |
Navigation Basics
Section titled “Navigation Basics”HelixScreen uses a consistent layout:
- Left sidebar: Five navigation buttons to switch between main panels
- Home button: Tapping Home returns to the Home panel (to whichever page you were last viewing). Tapping Home again while already on the Home panel jumps to the main (first) page.
- Back arrow: Returns from sub-panels to the parent panel
- Tap: Select buttons, open panels, activate controls
- Swipe: Scroll through lists and long content
Note: The Print Select panel is accessed by tapping the print area on the Home panel, not from the sidebar. The Controls and Filament panels require an active printer connection.
Touch Screen Basics
Section titled “Touch Screen Basics”HelixScreen supports these touch interactions:
| Gesture | Action |
|---|---|
| Tap | Select buttons, open panels, toggle options |
| Swipe | Scroll lists, move through content |
| Long press | Access alternate characters on keyboard |
| Swipe left/right on Home panel | Switch between widget pages |
| Pinch/spread | Zoom 3D views (G-code preview, bed mesh) |
Temperature displays are tappable shortcuts — tap the nozzle or bed temperature on the Home panel to jump directly to that temperature control panel.
Connection Status
Section titled “Connection Status”The Home panel shows your printer connection status:
| Indicator | Meaning |
|---|---|
| Green checkmark | Connected and ready |
| Red X | Disconnected (auto-reconnect in progress) |
| Yellow exclamation | Klipper not ready (firmware restart needed) |
When disconnected, a toast notification appears and HelixScreen attempts to reconnect automatically every few seconds.
First-Time Setup
Section titled “First-Time Setup”When you first start HelixScreen, the Setup Wizard guides you through initial configuration. You can re-run the wizard anytime via Settings > Factory Reset.
Setup Wizard
Section titled “Setup Wizard”The first time you launch HelixScreen, a setup wizard guides you through configuration. The wizard adapts to your hardware — steps that don’t apply to your setup are automatically skipped.
Core steps (always shown):
- Printer Setup: Network — Configure WiFi for this device, or skip if you’re using Ethernet
- Printer Setup: Connection — Enter your printer’s Moonraker address. If Moonraker is local or your screen is attached directly to the printer, HelixScreen connects automatically. Otherwise, enter the host and tap Test Connection before continuing.
- Heater Selection — Choose your bed and hotend heaters from the hardware detected on your printer
- Fan Selection — Choose your part cooling and hotend fans
- Summary — Review all your selections and save
Conditional steps (shown when hardware is detected):
| Step | Appears When |
|---|---|
| Touch Calibration | Resistive touchscreen detected (not yet calibrated) |
| Language Selection | Language not previously set on this device |
| Printer Identification | Printer model auto-detection suggests options (K1, K2, etc.) |
| AMS / Filament System | An AMS, CFS, Happy Hare, or other filament system is detected |
| LED Configuration | Addressable LED strips (NeoPixel, RGB) are discovered |
| Filament Sensor Setup | Multiple filament runout sensors are detected |
| Input Shaper | An accelerometer is detected on the printer |
| Help Improve HelixScreen | Shown on preset printers in place of the Summary step (see below) |
The Help Improve HelixScreen step asks whether to share anonymous usage statistics. No personal data is ever collected, and you can change this choice later in Settings > System. For details on what is and isn’t collected, see the Telemetry guide.
The progress indicator (e.g., “Step 3 of 8”) only counts the steps that apply to your setup — skipped steps aren’t shown or counted.
Preset Mode vs. Normal Setup
Section titled “Preset Mode vs. Normal Setup”Some printers (for example the Creality K1 or the FlashForge Adventurer 5M) ship with a preset that already knows the hardware layout. On these devices the wizard runs in preset mode: it skips the heater, fan, AMS, LED, filament-sensor, input-shaper, and printer-identification steps, and shows the Help Improve HelixScreen telemetry step in place of the Summary. The result is a shorter, mostly automatic setup flow. On a printer without a preset, you’ll see the full hardware-selection flow ending in the Summary step instead.
Adding Another Printer
Section titled “Adding Another Printer”If you have beta multi-printer support enabled, you can add a second printer later from the printer manager. This re-runs the wizard for the new printer, but skips the WiFi and Language steps (those are device-wide and already configured). On the first step, the button reads Cancel instead of Back — tapping it discards the new printer and returns you to the one you were using. See Beta Features for how to enable multi-printer support.
Tip: You can always go back to previous steps using the Back button. The connection test in step 2 must pass before you can proceed.
For details on touch screen calibration, see the Touch Calibration Guide.
What’s next: Once you finish the wizard, HelixScreen drops you on the Home panel, your main dashboard for status, prints, and temperatures — see the Home Panel guide.
Network (WiFi) Configuration
Section titled “Network (WiFi) Configuration”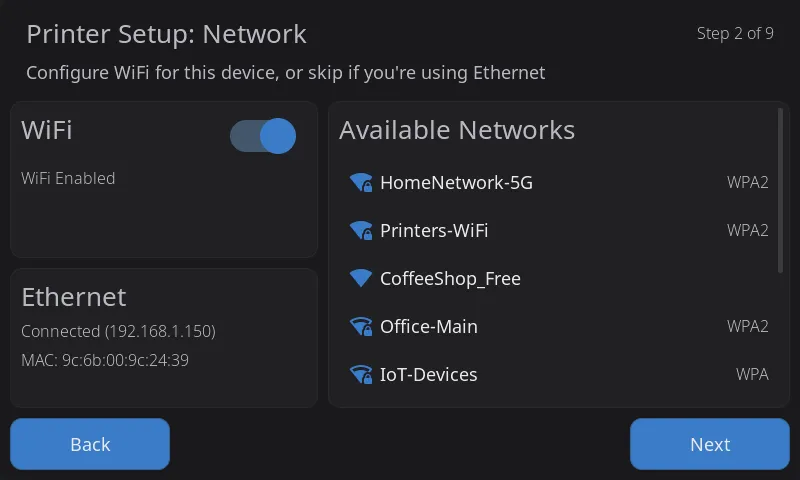
This step appears on-screen as Printer Setup: Network. If your device needs WiFi:
- Available networks appear in a list
- Tap a network to select it
- Enter the password using the on-screen keyboard
- Tap Connect and wait for confirmation
The wizard shows signal strength for each network and indicates which one you’re currently connected to. If you’re using Ethernet, you’ll see your connection status on the left — just skip ahead with Next.
Printer Connection
Section titled “Printer Connection”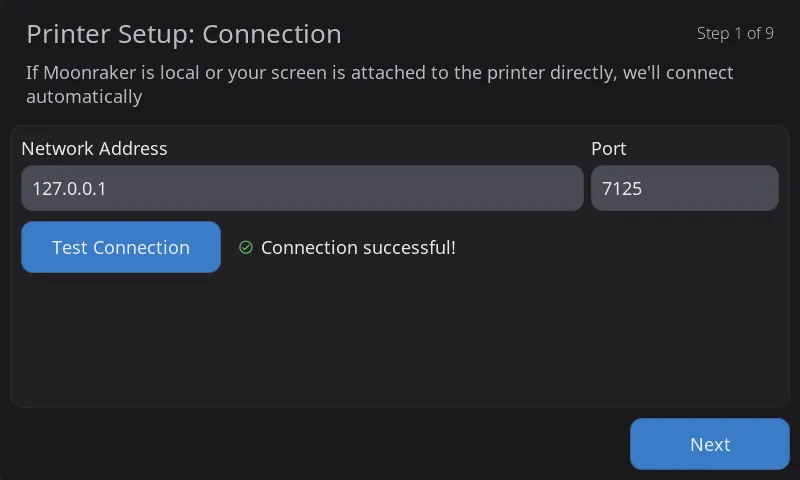
Enter your Moonraker connection details:
- Hostname or IP: Your printer’s address (e.g.,
voron.localor192.168.1.100) - Port: Defaults to
7125(auto-filled when you tap Test Connection if left empty) - API Key: Only needed if Moonraker requires authentication
If Moonraker is running locally — or your screen is attached directly to the printer — HelixScreen connects automatically, and you usually won’t need to change anything here. Otherwise, enter the host and tap Test Connection to verify before continuing. If the port field is empty, it auto-fills with the default port 7125.
Changing the host later: You can point HelixScreen at a different Moonraker host anytime from Settings > System > Host — see System Settings.
On-Screen Keyboard
Section titled “On-Screen Keyboard”The keyboard appears automatically for text input:
- QWERTY layout with number row
- Long-press for alternate characters (hold ‘a’ for ’@’, etc.)
- ?123 button: Switch to symbols
- ABC button: Switch to letters
- Shift: Toggle uppercase
USB Mouse & Keyboard
Section titled “USB Mouse & Keyboard”HelixScreen automatically detects USB mice and keyboards when plugged in at startup:
- USB Mouse: Works alongside the touchscreen — both are active simultaneously. A small white cursor dot appears on screen when a mouse is detected.
- USB Keyboard: Detected automatically. Useful for text entry fields like Wi-Fi passwords or console commands.
- Combo devices (e.g., Logitech K400 keyboard with trackpad): Both keyboard and trackpad functions work automatically.
Devices must be connected before HelixScreen starts. Hot-plugging is not currently supported — restart HelixScreen after connecting a new device.
Manual override: If auto-detection doesn’t find your device, you can specify the path directly:
# In helixscreen.envHELIX_MOUSE_DEVICE=/dev/input/event4HELIX_KEYBOARD_DEVICE=/dev/input/event5To find your device path, run cat /proc/bus/input/devices and look for your device name.
Simulator Shortcuts
Section titled “Simulator Shortcuts”When using the SDL2 desktop simulator:
| Key | Action |
|---|---|
| S | Take screenshot (saves to /tmp/) |
| D | Toggle dark/light mode |
| M | Toggle memory stats overlay |
| Escape | Exit application |
| Cmd+Q / Win+Q | Exit application |
Next: Home Panel | Back to User Guide