Filament
External Spool Configuration
Section titled “External Spool Configuration”If you’re not using an AMS or multi-material system, you can tell HelixScreen what filament is loaded by configuring an external spool. Tap the spool icon on the Filament panel to set the material, color, and brand. If Spoolman is configured, you can also link to a specific Spoolman spool.
Once configured, the external spool information is used throughout the UI:
- Spool preset button — A dynamic preset button appears on the Filament panel with your spool’s material name and recommended temperatures. Tap it to pre-heat both the nozzle and bed to the correct temperatures for your loaded filament.
- Temperature panel presets — The Nozzle and Bed temperature panels also show a spool preset button for quick one-tap heating.
- Purge temperature — When you tap Purge, HelixScreen automatically passes the recommended nozzle temperature to the purge macro (as the
PURGE_TEMPparameter), so macros that support it can heat to the right temperature.
The spool preset button only appears when the loaded material differs from the standard presets (PLA, PETG, ABS, TPU). For standard materials, just use the built-in preset buttons.
Tip: The spool preset updates automatically when you change the external spool configuration — no need to close and reopen panels.
Extrusion Panel
Section titled “Extrusion Panel”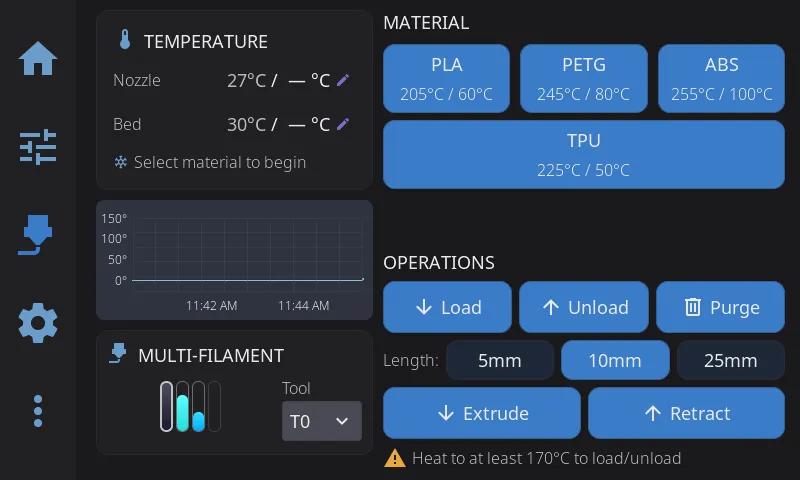
Manual filament control:
| Button | Action |
|---|---|
| Extrude | Push filament through nozzle |
| Retract | Pull filament back |
Amount selector: 5mm, 10mm, 25mm, 50mm Speed selector: Slow, Normal, Fast
Safety: Extrusion requires the hotend to be at minimum temperature (usually 180°C for PLA, higher for other materials). If HelixScreen knows what filament is loaded — either from an external spool or an active AMS slot — it skips the cold-nozzle safety warning and auto-preheats to the correct temperature instead.
Load / Unload / Purge
Section titled “Load / Unload / Purge”The Filament panel has dedicated Load, Unload, and Purge buttons. These run Klipper macros — HelixScreen auto-detects common names like LOAD_FILAMENT, UNLOAD_FILAMENT, and PURGE from your printer config.
Customizing which macro runs
Section titled “Customizing which macro runs”You can override any of these buttons to run a different macro:
- Go to Settings > Printer > Macro Buttons
- Scroll to the Standard Macros section
- Tap the dropdown for Load Filament, Unload Filament, or Purge
- Select (Auto) to use auto-detection, or pick any macro from your Klipper config
This works whether or not you have an AMS system. If a slot is left empty (no macro detected or configured), the button is disabled.
With an AMS system: The Load and Unload buttons use your AMS backend instead of running a macro — they trigger slot-based load/unload through the AMS panel. The Purge button still uses your configured macro.
Manual extrude/retract
Section titled “Manual extrude/retract”For manual control without macros, use the Extrude and Retract buttons on the extrusion widget with selectable amounts (5mm, 10mm, 25mm, 50mm) and speeds.
AMS / Multi-Material Systems
Section titled “AMS / Multi-Material Systems”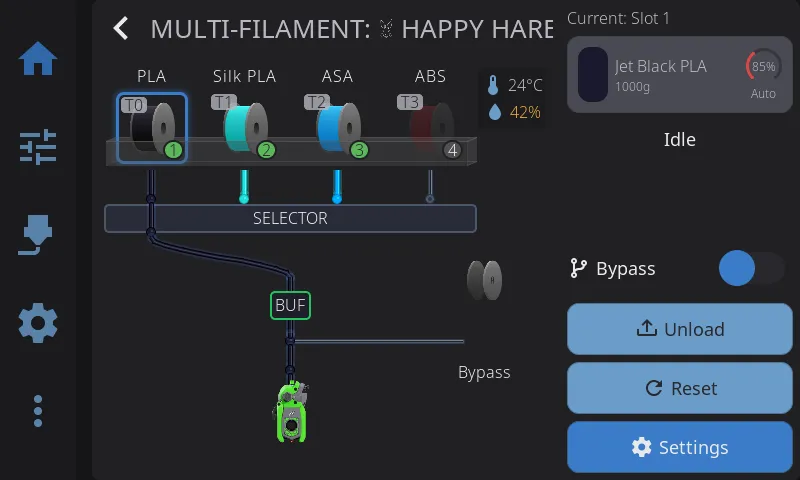
For multi-material systems (Happy Hare, AFC-Klipper, ACE, Tool Changer, etc.). The AMS panel has two main areas: the slot view on the left and the sidebar on the right.
Slot View (Left)
Section titled “Slot View (Left)”The left side shows all your filament slots in a visual tray layout:
- Spool icons — Each slot displays a 3D spool visualization with its filament color
- Material labels — Material type (PLA, PETG, ABS, etc.) shown above each spool
- Status badge — Slot number with color-coded background (green = loaded, gray = empty, red = error)
- Tool badge — If a slot is assigned to a specific extruder tool (T0, T1, etc.), a badge appears in the corner
Below the slot grid, a filament path diagram shows the routing from slots through the hub/selector to the toolhead. This updates in real time during load/unload operations, including eject animations when retracting filament at the slot sensor.
Above the slot view, a mini temperature graph shows live nozzle, bed, and chamber temperatures (when a chamber sensor or heater is present) so you can monitor heating during filament operations without switching panels.
Reading Error States
Section titled “Reading Error States”When a slot runs into trouble, HelixScreen shows it visually so you don’t have to dig through logs:
- Error dot — A small colored dot appears at the corner of a slot’s spool when that slot reports a problem. Red means an error (jam, runout, hardware fault); amber means a warning. With animations enabled, the dot gently pulses to draw your eye.
- Buffer-health tint — On systems with a buffer between the slots and the toolhead (AFC TurtleNeck, or Happy Hare with sync feedback), the hub on the filament path diagram changes color as the buffer drifts toward a fault: green when healthy, yellow when approaching the fault threshold, and red when at or past it.
To recover:
- Tap the affected slot and choose Reset Lane to clear a jam or error on that one slot (shown only on backends that support per-slot reset).
- For a system-wide problem, use Reset in the sidebar, or Recover in the AMS Management overlay (Settings), to bring the whole system back to a known-good state.
Sidebar (Right)
Section titled “Sidebar (Right)”The right sidebar shows the status of the currently loaded filament and provides quick-access controls.
Currently loaded section:
- “Current: Slot N” — Header showing which slot is active (or “Current: Bypass” when bypass is enabled)
- Color swatch — Large color indicator matching the loaded filament
- Material name — e.g., “Red PLA”, “Prusament PETG”
- Remaining weight — Estimated filament remaining (e.g., “750g”), if available
- Clog detection meter — When your system has flow monitoring (encoder, FlowGuard, or AFC buffer), an arc meter shows the current flow rate percentage
During load/unload operations, the sidebar switches to a step progress display showing each stage of the operation:
- Load (fresh): Heat nozzle → Feed filament → Purge
- Load (swap): Heat nozzle → Cut/form tip → Feed filament → Purge
- Unload: Heat nozzle → Cut/form tip → Retract
Each step updates in real time so you can see exactly where the operation is.
Action buttons (hidden while an operation is in progress):
| Button | Action |
|---|---|
| Bypass (toggle) | Feed filament directly to the extruder, bypassing the AMS. Only shown if your hardware supports bypass. |
| Unload | Retract the currently loaded filament back to its slot |
| Reset | Reset the AMS system state (useful after jams or errors) |
| Settings | Open the AMS Management overlay for advanced controls |
Slot Context Menu
Section titled “Slot Context Menu”Tap any slot to open a context menu with actions for that specific slot:
| Action | Description |
|---|---|
| Load | Feed filament from this slot to the toolhead. Disabled if the slot is empty. |
| Unload | Retract filament from this slot. Only available if this slot is currently loaded. |
| Eject | Push filament fully out of the lane to release the spool, when the slot has filament in its lane but not loaded into the toolhead. Replaces the Unload button in that state. Only on backends that support per-lane eject (AFC and Happy Hare). |
| Reset Lane | Clear an error or jam state on this slot. Only shown if your backend supports per-slot reset. |
| Spool Info | Open the filament editor to view or change material, color, vendor, and remaining weight. |
| Select Spool | Assign a saved Spoolman spool to this slot. Only shown when Spoolman is configured. |
| Scan QR Code | Scan a filament QR code to auto-fill spool data. Only shown when Spoolman is configured. |
On systems that support Endless Spool, the context menu also includes:
- Backup Slot — Choose a backup slot to automatically switch to if this spool runs out mid-print. The backup must hold a compatible material; the menu warns you if you pick an incompatible one. Shown only on backends that support endless spool (AFC, Happy Hare, and CFS auto-refill).
Assigning tools: Tool-to-slot mapping isn’t set from the slot context menu — it’s done from the filament mapping card that appears when you select a file to print. See Tool Mapping below.
Editing Filament Properties
Section titled “Editing Filament Properties”Tap Spool Info in the slot context menu to open the filament editor. This lets you tell HelixScreen what’s loaded in each slot — important for systems without automatic detection (RFID).
What you can edit:
- Color — Tap the color swatch to open a color picker
- Vendor — Select from a dropdown (e.g., Prusament, eSUN, Hatchbox)
- Material — Select the filament type (PLA, PETG, ABS, TPU, Nylon, etc.)
- Remaining weight — Tap the pencil icon to enable a slider and set how full the spool is (0–100%)
Read-only info:
- Nozzle temperature range — Recommended printing temperatures (e.g., 200–230°C)
- Bed temperature — Recommended bed temperature (e.g., 60°C)
Spoolman actions (when Spoolman is configured):
- Choose Saved Spool — Browse your Spoolman database and assign a spool. This auto-fills the vendor, material, color, and temperatures.
- Scan QR Code — Scan a filament spool’s QR code to look it up in Spoolman
- More actions button (▾ dropdown) — Tap the dropdown arrow for additional actions:
- Spool Details — View the full Spoolman spool record
- Unlink — Remove the Spoolman association (appears only when a spool is linked)
- Print Label — Print a physical label for this spool (appears only when a label printer is set up)
Tap Save to apply your changes, or Cancel to discard them.
Tool Mapping
Section titled “Tool Mapping”For multi-tool prints, you can control which AMS slot feeds each tool the slicer expects (T0, T1, T2, …). The mapping controls appear as a filament mapping card on the file detail screen — open a file from the print browser and, if your file uses multiple tools and your AMS supports editable tool mapping, the card shows a compact row of color pairs. Tap the card to open the Filament Mapping dialog.
In the dialog you get one row per tool in the file:
- Map to closest colors with matching material (toggle at the top) — When on, HelixScreen auto-assigns each tool to the loaded slot with the nearest color and a compatible material; the rows become read-only. When off, you assign tools yourself.
- Manual assignment — With the toggle off, tap a tool’s row to pick which slot feeds it.
- Mismatch warnings — A warning icon appears on any row mapped to an empty slot or a slot whose material doesn’t match what the tool needs.
Tap Done to keep your mapping, or Cancel to discard it.
Note: The mapping card only appears on backends with editable tool mapping. On fixed 1:1 systems (Snapmaker U1, ACE) tools always map directly to their matching slot, so there’s nothing to assign.
Syncing with OrcaSlicer (2.3.2 and later, including 2.4.0)
Section titled “Syncing with OrcaSlicer (2.3.2 and later, including 2.4.0)”When you edit spool info in HelixScreen — on any supported filament system (AD5X IFS, Snapmaker U1, ACE, CFS) — that information is saved to your printer in the standard location OrcaSlicer 2.3.2 and later reads automatically. Open OrcaSlicer after editing and your slot’s vendor, material, color, and temperatures show up in the filament panel with no extra setup.
AFC (Box Turtle) and Happy Hare work the same way automatically — your lane assignments flow through to OrcaSlicer with nothing to configure.
Either way, your printer’s filament info and OrcaSlicer stay in sync. The sync is one-way (your printer → OrcaSlicer): editing in OrcaSlicer doesn’t change what’s loaded in your AMS.
Tip: For the cleanest match, use material names OrcaSlicer recognizes (PLA, PETG, ABS, TPU, etc.). OrcaSlicer matches your slot to a filament preset by material name, so a slot set to “PLA” auto-selects a PLA preset.
Requirements: OrcaSlicer 2.3.2 or newer, connected to the same printer’s Moonraker. Nothing to enable on the HelixScreen side — it’s automatic.
AMS Management (Settings Overlay)
Section titled “AMS Management (Settings Overlay)”Tap Settings in the sidebar to open the AMS Management overlay with advanced controls:
- Home — Return the AMS to its home position
- Recover — Attempt to recover from an error state
- Abort — Cancel the current operation immediately
- Bypass Mode — Toggle direct-feed mode (if supported by hardware)
- System status — Current system state and firmware version
Below the top-level controls, device-specific settings appear as expandable sections that vary by hardware. Tap a section to open it; inside you’ll find buttons, on/off toggles, and sliders for that group, and changes apply immediately.
AFC (Box Turtle and friends) exposes the richest set, organized into sections:
| Section | What’s inside |
|---|---|
| Setup | Run Calibration Wizard, Bowden Length, LED toggles (system + per-toolhead), Quiet Mode |
| Speed Settings | Forward and reverse move-speed multipliers |
| Toolhead | Sensor-to-nozzle, unload, and post-sensor clear distances (per tool) |
| Maintenance | Test All Lanes, Change Blade, Park, Clean Brush, Reset Motor Timer |
| Hub & Cutter | Cutter enable, cut distance, hub bowden length, assisted retract |
| Tip Forming | Ramming volume, unloading start speed, cooling-tube length and retraction |
| Purge & Wipe | Purge enable/length, brush-wipe enable |
Other backends show their own (usually smaller) set of sections, or none at all.
- When an AMS slot is actively loaded, its material information drives spool preset behavior — you’ll see a spool preset button on the Filament and Temperature panels, and purge macros receive the correct temperature automatically. See External Spool Configuration for details.
- The filament path diagram at the bottom of the slot view is interactive — you can tap slot entry points to trigger a load.
- During a load or unload, watch the step progress in the sidebar to track exactly where the operation is.
Multiple Filament Systems
Section titled “Multiple Filament Systems”HelixScreen supports running multiple filament management backends at the same time. For example, a toolchanger printer might use both a Tool Changer backend and Happy Hare for different parts of the filament path.
When multiple backends are detected:
- A backend selector appears at the top of the AMS panel
- Tap to switch between systems (e.g. “Happy Hare” vs “Tool Changer”)
- Each backend has its own slots and status display
- Slot assignments and controls are independent per backend
Supported system types:
| System | Description |
|---|---|
| CFS | Creality Filament System (K2 series, plus K1/K1C/K1 Max with the official CFS upgrade) |
| Happy Hare | MMU2, ERCF, 3MS, Tradrack, EMU |
| AFC | Box Turtle, OpenAMS, ViViD |
| ACE | Anycubic ACE Pro (via ValgACE/BunnyACE/DuckACE Klipper drivers) |
| Tool Changer | Toolchanger-based filament routing |
| AD5X IFS | FlashForge Adventurer 5X Intelligent Filament Switching (requires ZMOD firmware v1.7.0 or newer) |
| SnapSwap | Snapmaker U1 4-toolhead changer (parallel, one independent toolhead per slot) |
Each system displays its own logo in the AMS panel header. Happy Hare and AFC show their firmware logos; specific hardware variants (ERCF, Box Turtle, ViViD, etc.) show hardware-specific logos when detected.
Single-backend setups are unaffected — the panel works exactly as before with no selector shown.
Creality Filament System (CFS)
Section titled “Creality Filament System (CFS)”The CFS is an enclosed filament storage and delivery system for Creality printers. It ships on the K2 series, and is also supported on the K1, K1C, and K1 Max once you install Creality’s official CFS upgrade kit and firmware. Each CFS unit holds 4 spools of filament, and up to 4 units can be connected (16 total slots). HelixScreen auto-detects CFS — and the correct macro dialect for your printer (K2 uses CR_BOX_* macros, K1 series uses BOX_*) — when connected.
K1 series note: CFS on the K1, K1C, and K1 Max requires Creality’s official CFS upgrade firmware (v2.3.5.33 or newer). HelixScreen detects the K1 macro dialect automatically; no manual configuration is needed.
Slot Layout
Section titled “Slot Layout”CFS uses a TNN address format to identify each slot:
| Unit | Slot A | Slot B | Slot C | Slot D |
|---|---|---|---|---|
| Unit 1 | T1A | T1B | T1C | T1D |
| Unit 2 | T2A | T2B | T2C | T2D |
| Unit 3 | T3A | T3B | T3C | T3D |
| Unit 4 | T4A | T4B | T4C | T4D |
Each slot displays the detected filament color, material type (PLA, PETG, ABS, etc.), brand, and remaining filament length.
RFID Detection
Section titled “RFID Detection”CFS units have built-in RFID readers that automatically detect Creality filament spools:
- Place a spool in any slot and its material info appears within seconds
- Supported materials include Hyper PLA, Hyper PETG, Hyper ABS, CR-PLA, CR-Silk, and more
- Remaining filament length is tracked automatically
- If a spool isn’t recognized, a generic entry is shown — you can identify it manually
Tip: If a slot shows incorrect info, remove and re-seat the spool to trigger a fresh RFID read.
CFS Device Actions
Section titled “CFS Device Actions”Tap the menu icon on the CFS panel to access device actions:
| Action | What It Does |
|---|---|
| Refresh | Re-read all RFID tags across all units — useful after swapping spools while the printer was off |
| Auto-Refill | Toggle automatic backup spool switching — when enabled, if the current spool runs out mid-print, the system loads the next spool of the same material |
| Nozzle Clean | Trigger the nozzle cleaning routine using the CFS’s built-in silicone strip |
Snapmaker U1 (SnapSwap)
Section titled “Snapmaker U1 (SnapSwap)”The Snapmaker U1 is a 4-toolhead changer, not a shared-path AMS. Each of its four slots has its own independent toolhead, so the topology is parallel — slot 1 always feeds tool 0, slot 2 feeds tool 1, and so on (a direct 1-to-1 mapping). There is no hub or selector to share between slots.
RFID Detection
Section titled “RFID Detection”Each channel has an RFID reader that reads Snapmaker filament tags automatically:
- Material type and sub-type (e.g. “PLA SnapSpeed”), manufacturer, and brand appear per slot
- Color, recommended nozzle/bed temperatures, and spool weight come from the tag
- When you physically swap a spool, the new tag is detected and any stale metadata you’d previously entered for that slot is cleared automatically
You can still edit spool info manually from the slot context menu for spools without a tag.
Runout and Resume
Section titled “Runout and Resume”The U1 tracks filament with a motion sensor per tool. When a runout fires mid-print, HelixScreen prepares the printer before resuming — disabling the runout sensor, heating the tool, priming a short length of filament past the encoder, and re-enabling the sensor — so a plain Resume actually continues the print. If the motion sensor reports a runout but filament is still physically present (a stale sensor reading), HelixScreen recovers silently without prompting you.
Note: Because each toolhead is independent, the Snapmaker backend has no Home, Recover, Reset, Bypass, or Endless Spool controls — those apply to shared-path AMS hardware only.
Spoolman Integration
Section titled “Spoolman Integration”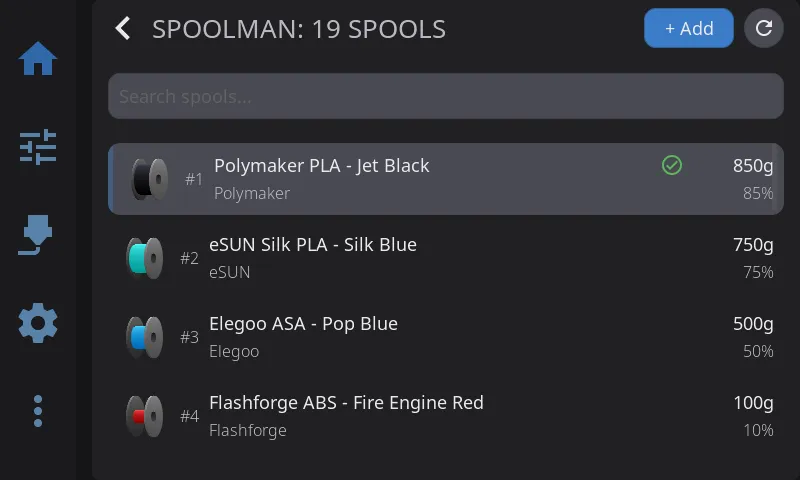
When Spoolman is configured:
- Spool name and material type displayed per slot
- Remaining filament weight shown
- Tap a slot to open Spool Picker and assign a different spool
Spoolman Panel
Section titled “Spoolman Panel”Access via the Filament nav tab. Browse, search, and manage your entire spool inventory:
- Search — Filter spools by vendor, material, or color name
- Context menu — Tap a spool to set active, edit, or delete
- 3D spool visualization — Color-coded fill level at a glance
New Spool Wizard
Section titled “New Spool Wizard”Tap + Add in the Spoolman panel to create a new spool in 3 steps:
- Select Vendor — Search existing vendors or tap + New to add one
- Select Filament — Pick an existing filament or tap + New to create one with material, color, temperature ranges, and weight
- Spool Details — Set remaining weight, price, lot number, and notes
The wizard creates all records (vendor, filament, spool) atomically in Spoolman.
Tip: You can print physical spool labels with a QR code linking to Spoolman. See Label Printing for setup instructions.
Filament Drying
Section titled “Filament Drying”Many filament materials absorb moisture from the air over time. Wet filament prints poorly — you may see popping, stringing, reduced layer adhesion, or a rough surface finish. Drying the filament before or during a print removes that moisture and restores print quality. Hygroscopic materials that benefit most include Nylon, PA-CF, TPU, and PETG; PLA is less sensitive but still benefits after long storage.
Supported Systems
Section titled “Supported Systems”Dryer control is available on hardware that includes an integrated heated chamber:
| System | Notes |
|---|---|
| Anycubic ACE Pro | Built-in drying chamber with fan |
| Happy Hare | On MMU setups where a heater is configured |
| QIDI Box | PTC heater in the filament storage unit (QIDI PLUS4, Q2, MAX4) |
Systems without a dedicated drying chamber (AFC Box Turtle, Creality CFS, AD5X IFS, Snapmaker U1, tool changers) do not have dryer controls — the option won’t appear for those.
Using the Dryer
Section titled “Using the Dryer”Open the dryer controls from the multi-filament panel:
- Open the Filament panel from the sidebar.
- Tap Settings to open the AMS Management overlay.
- The dryer controls appear if your hardware supports drying.
From the dryer panel you can:
- Set target temperature — Use the slider or tap the value to type a temperature. The target is automatically clamped to the safe maximum for your unit (typically 65–90 °C depending on firmware).
- Set duration — Choose how long to dry, in hours. Some systems accept a custom duration; others offer material-based presets.
- Pick a material preset — If presets are available, tap a material name (PLA, PETG, Nylon, etc.) to fill in the recommended temperature and time automatically.
- Start drying — Tap Start to begin. The heater activates and the chamber temperature climbs to your target.
- Watch the countdown — While drying, the panel shows the current chamber temperature, humidity (when a sensor is present), and the time remaining.
- Stop early — Tap Stop at any time to turn off the heater. Remaining time is discarded; it is safe to stop mid-session.
QIDI Box note: QIDI Box drying control requires recent QIDI firmware that exposes the
box_extrasKlipper plugin. On older firmware, the heater still works but the session timer won’t be tracked — the heater runs until you tap Stop.
Typical Drying Parameters
Section titled “Typical Drying Parameters”These are general-purpose starting points. Your filament manufacturer’s guidance takes priority.
| Material | Temperature | Time |
|---|---|---|
| PLA | 45 °C | 4–6 h |
| PETG | 55 °C | 4–6 h |
| ABS / ASA | 60 °C | 4 h |
| TPU / TPE | 50 °C | 4–8 h |
| Nylon (PA) | 60 °C | 8–12 h |
| PA-CF / PA-GF | 60 °C | 8–12 h |
Filament that has been stored open for a long time may need the longer end of the range.
Multi-Unit Setups
Section titled “Multi-Unit Setups”If you have multiple Box units connected, each unit has its own dryer with independent controls. The panel shows which unit you are controlling. You can run dryers on multiple units at the same time — each unit heats independently.
See Also
Section titled “See Also”- Temperature Control — Preheat presets work with spool material info
- Bluetooth Setup — Required for Bluetooth-connected AMS and label printers
- Label Printing — Print physical spool labels with Spoolman data
- Settings: Hardware & Devices — AMS, Spoolman, and filament sensor configuration
Next: Label Printing | Prev: Motion & Positioning | Back to User Guide