Motion
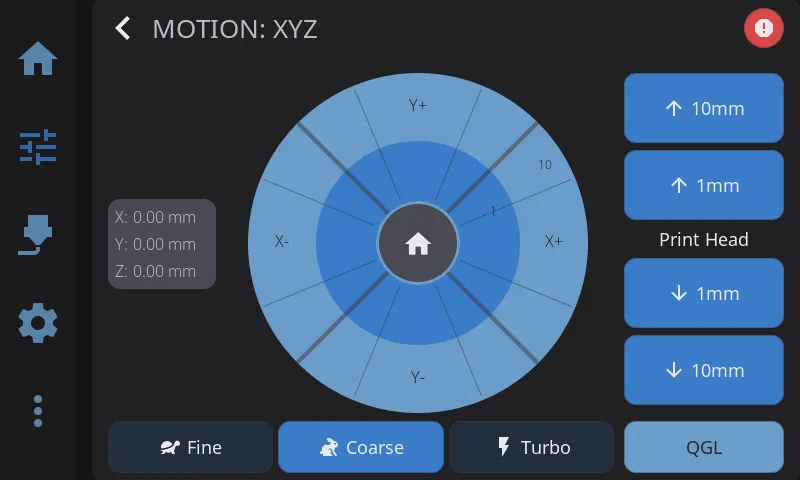
Open the Motion screen by tapping Motion on the Controls panel. It has two columns: a circular jog pad with a position readout on the left, and the Z-axis controls (plus leveling buttons) on the right.
Position Display
Section titled “Position Display”To the left of the jog pad, a card shows the current X, Y, and Z coordinates. Each axis has a small status dot:
- Green dot — that axis is homed
- Gray dot — that axis is not homed yet
On printers that report an independent measured Z height (for example, with a scanning probe active), a second Act: line appears under Z showing the actual measured height alongside the commanded Z.
Jog Pad
Section titled “Jog Pad”The jog pad is a circular control with three concentric zones, plus a direction for each of the four arrows around it:
- Center (home button) — tap the home icon in the middle to home X and Y
- Inner ring — tap an arrow here to move by the smaller step for the current mode
- Outer ring — tap an arrow here to move by the larger step for the current mode
The distance labels printed on the rings update to match the active jog mode.
Jog Modes
Section titled “Jog Modes”Three modes control how far the print head moves per tap. Toggle between them using the Fine, Coarse, and Turbo buttons below the jog pad.
| Mode | Inner Ring | Outer Ring | Best For |
|---|---|---|---|
| Fine | 0.1mm | 1mm | Precise calibration, Z-offset, first-layer tuning |
| Coarse | 1mm | 10mm | General positioning, moving to a specific area |
| Turbo | 10mm | 50mm | Rapid movement across the full build plate |
The Z-axis buttons on the right follow the same mode — their labels update to show the current step sizes.
Tip: Your selected jog mode is remembered between sessions. If you frequently do calibration work, leave it on Fine; for everyday use, Coarse is the default.
Z-Axis Controls
Section titled “Z-Axis Controls”The right column has four Z buttons (two large steps and two small steps, up and down) with a label between them. The label reads either Bed or Print Head depending on your printer’s kinematics — on bed-slinger printers the bed is what moves in Z, while on CoreXY and delta printers the print head moves. The arrow direction always reflects whether the nozzle is moving closer to or farther from the bed, so “up” always means more clearance.
Leveling (QGL / Z-Tilt)
Section titled “Leveling (QGL / Z-Tilt)”If your printer supports it, leveling buttons appear at the bottom of the right column:
- QGL — runs Quad Gantry Level. Shown only on printers configured with
quad_gantry_level(common on Voron 2.x and similar four-Z-motor gantries). Levels the gantry against the bed using the corner probe points. - Z-Tilt — runs Z-Tilt Adjust. Shown only on printers configured with
z_tilt_adjust(common on dual- or triple-Z printers like the Voron Trident). Compensates for tilt between independent Z lead screws.
Tap either button to start the routine. A status message confirms when it begins and when it completes. Both buttons are disabled during an active print and while another leveling or homing operation is already running.
These same buttons are also available on the Controls panel — see Leveling on the Controls Panel below.
Homing
Section titled “Homing”Homing buttons live on the Controls panel (not the Motion screen). The Home row there is a segmented bar:
| Button | Action |
|---|---|
| All | Homes X, Y, and Z |
| X | Homes X only |
| Y | Homes Y only |
| XY | Homes X and Y |
| Z | Homes Z only (requires X/Y homed first on most printers) |
Each segment turns green once that axis is homed and gray when it isn’t. All segments are disabled while a homing or leveling operation is in progress.
The jog pad’s center home button (on the Motion screen) is a shortcut that homes X and Y.
Leveling on the Controls Panel
Section titled “Leveling on the Controls Panel”The Controls panel’s Calibration & Tools card includes the same leveling actions as the Motion screen, alongside Bed Mesh and Z Calibration:
- QGL — Quad Gantry Level (shown only when
quad_gantry_levelis configured) - Z-Tilt — Z-Tilt Adjust (shown only when
z_tilt_adjustis configured)
Both are disabled during an active print and while another operation is running.
Motors Off
Section titled “Motors Off”The Motors Off button on the Controls panel’s Calibration & Tools card releases all stepper motors, letting you move the gantry and bed by hand. The button shows a lit motor icon when steppers are energized and a dimmed one when they’re already off — when the motors are already disabled, the button is greyed out and does nothing.
Tapping it asks for confirmation (“Release all stepper motors. Position will be lost.”) before disabling the steppers.
Safety note: Releasing the motors drops all holding torque. On a bed-slinger the bed can drop or the gantry can sag under its own weight, and the printer no longer knows its position — you must re-home before printing or jogging. Don’t disable the motors mid-print.
Emergency Stop
Section titled “Emergency Stop”The E-Stop button (top-right of the Motion screen header, and on the Controls panel) halts all printer motion immediately. You can optionally require a confirmation tap to prevent accidental presses — see Settings > Safety > E-Stop Confirmation.
Next: Filament Management | Prev: Temperature Control | Back to User Guide