
Sound
This content is for 1.1 (beta). Switch to the stable release docs.
Settings > Sound turns sounds on or off and sets how loud they are and what they sound like. The Sound row only appears on the Settings screen when HelixScreen finds a speaker or buzzer it can use (see Supported Hardware).
On the Settings screen, the Sound row shows your volume, for example Volume 60%, or Muted when sounds are off.
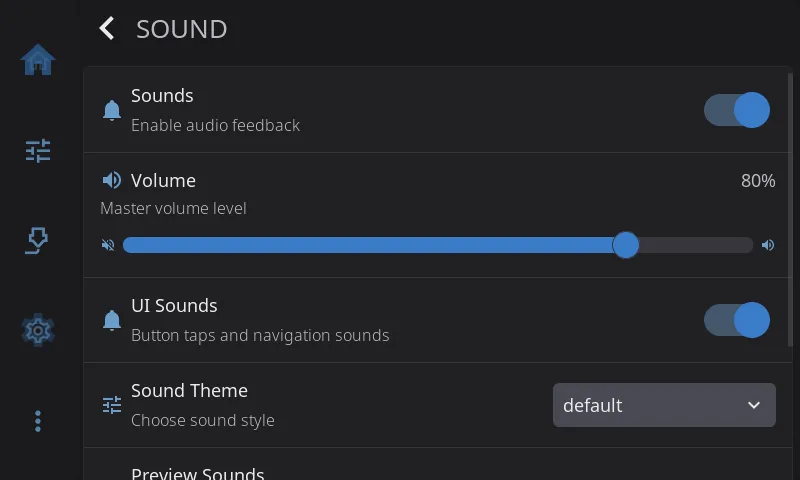
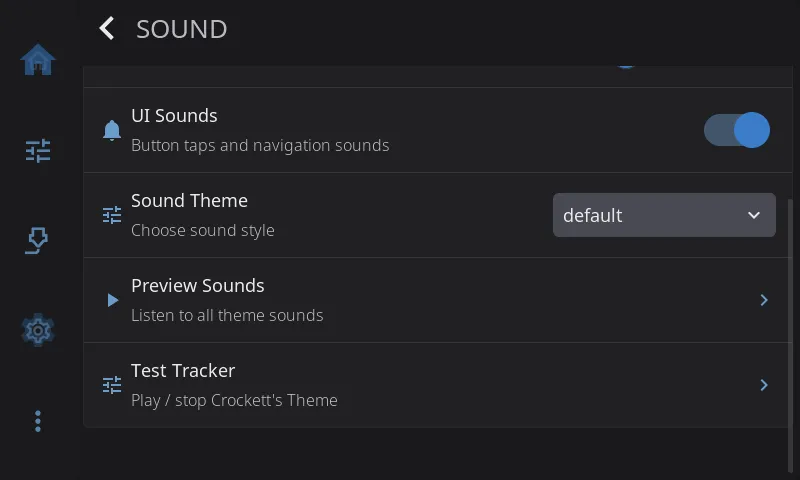
Sounds
Section titled “Sounds”The master switch. Turns every sound on or off. Off on a fresh install, so turn it on to hear anything. When it’s off, the rest of the rows on this page are hidden.
The Sound options are there as soon as HelixScreen starts, before the printer connects. If no speaker is found once the printer connects, they’re hidden.
Volume
Section titled “Volume”Sets the volume for every sound, from 0% to 100%. Starts at 80%.
UI Sounds
Section titled “UI Sounds”Button taps, switch clicks and the sounds for opening and closing screens. On by default. Turn it off to keep only the sounds that matter: print finished, errors and alarms.
Sound Theme
Section titled “Sound Theme”Picks the style of every sound. A test sound plays when you switch. The five built-in themes:
| Theme | Sound |
|---|---|
| Default | Balanced and understated. Soft clicks, smooth navigation chirps and a melodic fanfare when a print finishes |
| Minimal | Only the important events: print finished, errors and alarms. No button or navigation sounds |
| Retro | 8-bit chiptune. Square-wave arpeggios, a victory fanfare and buzzy retro alarms |
| Miami Vice | Punchy 80s synth with a driving rhythm and a soaring lead for print finished |
| Crockett’s Theme | Warm, cinematic 80s synth with long sustains and filter sweeps. Startup plays the Crockett’s Theme melody |
You can also make your own theme. See Custom Sound Themes.
Output Device
Section titled “Output Device”Chooses which sound card plays HelixScreen’s sounds, for example an HDMI screen with its own speakers or the board’s built-in output. Only shown on printers that play sound through a Linux sound card (ALSA) and have a list of devices to choose from.
Preview Sounds
Section titled “Preview Sounds”Opens a screen with a button for every sound in the current theme. Tap one to hear it. Useful for comparing themes or testing a theme you made.
Test Tracker
Section titled “Test Tracker”Plays, or stops, the Crockett’s Theme music track. Use it to check that music plays properly on your printer. Only shown on printers that can play music tracks.
What Sounds When
Section titled “What Sounds When”| Event | Sound | When it plays |
|---|---|---|
| Button press | Short click | You tap a button |
| Switch on | Rising chirp | You turn a switch on |
| Switch off | Falling chirp | You turn a switch off |
| Navigate forward | Rising tone | A screen opens |
| Navigate back | Falling tone | You go back or close a screen |
| Print complete | Victory melody | A print finishes |
| Print cancelled | Falling tone | A print is cancelled |
| Error alert | Pulsing alarm | Something went seriously wrong |
| Error notification | Short buzz | An error message pops up |
| Critical alarm | Urgent siren | A critical failure needs your attention |
| Test sound | Short beep | You tap a button in Preview Sounds |
| Startup | Theme jingle | HelixScreen starts |
The first five are UI sounds and follow the UI Sounds switch. The rest play whenever the master Sounds switch is on.
Custom Sound Themes
Section titled “Custom Sound Themes”You can add your own theme without touching the HelixScreen install:
- SSH into your printer.
- Create the sounds folder if it isn’t there yet:
mkdir -p ~/helixscreen/config/sounds - Copy a built-in theme to start from:
cp ~/helixscreen/assets/config/sounds/default.json ~/helixscreen/config/sounds/mytheme.json - Edit the file. Change the
"name"field, then change the sounds. - Your theme appears in the Sound Theme menu right away.
Custom themes can use everything the built-in ones do: four wave shapes (square, saw, triangle, sine), envelopes, pitch sweeps, filters with sweeps, LFO modulation, chords of up to 4 notes, note names (C4, F#5, Bb3) and note lengths (8n, 4n., 16t) with a tempo.
A custom theme with the same file name as a built-in one replaces it.
The full file format is in the Sound System developer docs.
Supported Hardware
Section titled “Supported Hardware”| Hardware | How it plays |
|---|---|
| Desktop (SDL) | Full sound through your computer’s speakers. The best quality |
| Linux sound card (ALSA) | Full sound with 4 notes at once, plus music tracks for richer themes |
| FlashForge AD5X | The printer’s speaker. Chords, full themes and music (including the startup jingle) played as tone sequences |
| FlashForge AD5M / AD5M Pro | The printer’s buzzer. Tones only: no startup music and no music themes |
| Other Klipper printers | Beeps sent through Moonraker. Needs [output_pin beeper] in your Klipper config. Simple beeps only |
| Buzzer on a board’s PWM pin | A buzzer wired to a Raspberry Pi, BTT CB1 or other board. UI sounds and alerts on the buzzer, or on a Pi 4 or earlier, full sound including music through its audio. See Buzzer on a PWM Pin |
If no sound hardware is found, the Sound row and page are hidden.
Turning sound off completely. On some hardware (for example the Artillery M1 Pro) the sound drivers work but use too much processor time. If the printer slows down with sound on, add "disable_sound": true to settings.json, or start HelixScreen with --no-sound. That stops the sound system from starting at all. The Sounds switch only mutes it.
Buzzer on a PWM Pin
Section titled “Buzzer on a PWM Pin”A small buzzer wired straight to your board’s header can play HelixScreen’s sounds. This works on any Linux board, not just a Raspberry Pi, as long as the buzzer sits on a pin that can output hardware PWM and the board exposes that PWM under /sys/class/pwm. An ordinary GPIO pin can’t do it.
First, free the pin from Klipper. If your Klipper config has an [output_pin beeper] (or similar) on that pin, comment it out and restart Klipper. Klipper and HelixScreen can’t both drive the same pin. Any M300 or song macros that used it will then fail, so turn them into empty macros as well.
Drive the buzzer directly (any board)
Section titled “Drive the buzzer directly (any board)”HelixScreen drives the pin itself. It’s louder than the Pi audio option, but a buzzer plays one note at a time, so you get HelixScreen’s button sounds and alerts, not music.
- Turn the pin into a PWM output. How depends on the board: a device-tree overlay on a Raspberry Pi or Armbian, or your vendor’s pin-mux setting. On a Raspberry Pi 4 or earlier, add one line to
/boot/config.txt(or/boot/firmware/config.txton newer systems) and reboot:On a Pi 4 or earlier, the pins that can do PWM are GPIO 12, 13, 18 and 19 (header pins 32, 33, 12 and 35). A Raspberry Pi 5 uses different PWM hardware with its own overlay settings and channel numbers: check the Pi 5 documentation for your pin.# GPIO 18 (header pin 12). For GPIO 12 use: dtoverlay=pwm,pin=12,func=4dtoverlay=pwm,pin=18,func=2 - Find the channel. It’s the chip and channel number under
/sys/class/pwm:pwmchip0channel0is"0:0". Runls /sys/class/pwmafter the reboot to see which chips exist. On a Pi 4 or earlier, use"0:0"for GPIO 12 or 18, and"0:1"for GPIO 13 or 19. On other boards, including the Pi 5, the board’s pinout or its overlay documentation lists whichpwmchipand channel a pin uses. - Tell HelixScreen. In
settings.json, add the line below. If the file already has a"sound"section, put"pwm_channel"inside it instead of adding a second one:"sound": { "pwm_channel": "0:0" } - Restart HelixScreen, and turn on Settings > Sound > Sounds.
The user HelixScreen runs as needs write access to /sys/class/pwm. On Raspberry Pi OS, being in the gpio group gives it. Other systems may need a udev rule that grants that access, or HelixScreen running as root.
Full sound through the Pi’s audio (Raspberry Pi 4 and earlier)
Section titled “Full sound through the Pi’s audio (Raspberry Pi 4 and earlier)”A Raspberry Pi 4 or earlier can instead send its own audio output to the buzzer pins. The Pi 5 has no analog audio, so this option doesn’t exist there. HelixScreen then plays everything through its normal sound path: chords, music and every theme. On a small buzzer it is quieter than driving it directly. Leave pwm_channel unset, add one line to /boot/config.txt and reboot:
# Pi audio on GPIO 18 and 19 (use pins_12_13 for GPIO 12 and 13)dtoverlay=audremap,pins_18_19HelixScreen finds the sound card by itself. Turn the volume up all the way with amixer sset PCM 100%, and run sudo alsactl store to keep that level after a reboot.
Sound Troubleshooting
Section titled “Sound Troubleshooting”There’s no Sound row in Settings.
HelixScreen didn’t find a speaker or buzzer. On a Klipper printer, check that printer.cfg has an [output_pin beeper] section, then restart HelixScreen.
Sounds are too quiet or too loud. Move the Volume slider. Themes differ in loudness too, so try another theme.
The print-finished sound doesn’t play. Check that the master Sounds switch is on. The UI Sounds switch doesn’t affect it.
Button clicks get on my nerves. Turn off UI Sounds. Buttons, switches and screen changes go quiet, and important sounds still play.
I wired a buzzer to the board, and nothing plays.
Check which pin it is really on. On a Pi, Klipper’s gpio12 means GPIO 12 (header pin 32), not header pin 12, which is GPIO 18. Make sure Klipper no longer uses the pin, and follow Buzzer on a PWM Pin.
Sounds work on my computer but not on the printer.
Check that the printer has sound hardware. On a Klipper printer, check that [output_pin beeper] is set up, and test it by sending M300 from the Klipper console.