
Motion
This content is for 1.1 (beta). Switch to the stable release docs.
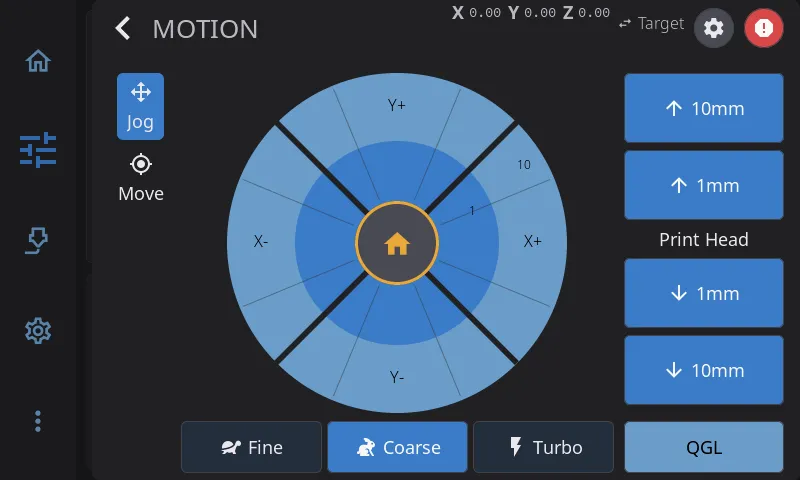
Open the Motion screen by tapping Motion on the Controls panel. It has three tabs, Jog, Move and Bed, and always opens on Jog. In landscape the tabs sit in a rail on the left edge of the screen; in portrait they become icon pills in the header. The Jog tab has the circular jog pad with a Z-axis column (plus leveling buttons); the Move tab has a grid of bed positions (see Move Tab); the Bed tab is a map of the plate you tap to send the toolhead there (see Bed Tab). The Z buttons stay on the right on every tab.
Position Display
Section titled “Position Display”The current X, Y, and Z coordinates sit in the header of the Motion screen (in portrait they form a row just under the header). Each axis letter is dimmed while that axis is not homed yet.
- Tap a coordinate to open a number pad and send the toolhead straight to that position. Values outside the printer’s range are refused with “Value must be between A and B” - nothing moves. If the axis isn’t homed yet, the printer homes it first and then makes the move; no extra confirmation is needed.
- Tap the Target / Actual chip next to the coordinates to switch what they show: Target (the position you asked for) or Actual (where the nozzle really is, with z-offset, tool offsets and bed mesh correction applied, updating while it moves). The chip names the mode on screen and lights up while Actual is shown. The choice is remembered separately for each printer.
The coordinates are greyed out whenever the printer isn’t ready - not connected, or still starting up.
Jog Pad
Section titled “Jog Pad”The jog pad is a circular control with three concentric zones, plus a direction for each of the four arrows around it:
- Center (home button) - tap the home icon in the middle to home all axes (X, Y, and Z)
- Inner ring - tap an arrow here to move by the smaller step for the current mode
- Outer ring - tap an arrow here to move by the larger step for the current mode
The distance labels printed on the rings update to match the active jog mode.
Press and hold any arrow (or a Z button) to repeat: after roughly half a second the move repeats about seven times per second for as long as you hold. A quick tap makes exactly one move.
Jog Modes
Section titled “Jog Modes”Three modes control how far the print head moves per tap. Toggle between them using the Fine, Coarse, and Turbo buttons below the jog pad.
| Mode | Inner Ring | Outer Ring | Best For |
|---|---|---|---|
| Fine | 0.1mm | 1mm | Precise calibration, Z-offset, first-layer tuning |
| Coarse | 1mm | 10mm | General positioning, moving to a specific area |
| Turbo | 10mm | 50mm | Rapid movement across the full build plate |
Those distances are the defaults. You can set your own in the Motion settings (see below), and the table above then shows whatever you configured.
The Z-axis buttons on the right follow the same mode - their labels update to show the current step sizes.
Tip: Your selected jog mode is remembered between sessions. If you frequently do calibration work, leave it on Fine; for everyday use, Coarse is the default.
Motion Settings
Section titled “Motion Settings”Added in 1.1.
Besides the distances, the jog pad’s own speed is adjustable. There are two places to reach the settings, and both open the same panel:
- the cog icon in the Motion screen’s header, next to the title (hidden on small screens - use the Settings path there)
- Settings > Printing > Motion
| Setting | What It Does |
|---|---|
| Jog Speed XY | How fast the toolhead travels on X/Y taps, in mm/s. The slider tops out at what the printer itself allows - its reported maximum feedrates - so you cannot ask for more than the machine will do. If you stored a speed and the printer later reports a lower ceiling (a firmware change, a different printer), the stored choice is kept but applied at the new ceiling. |
| Jog Speed Z | Same, for the Z axis. |
| Fine / Coarse / Turbo distances | The inner- and outer-ring distance for each of the three jog modes. Each distance is tapped in on a keypad; the inner and outer values of a mode cannot cross. |
| Bed Map Clearance | How high the nozzle must be before a Bed tab move travels, 1 to 50 mm (default 5 mm). Below it, the nozzle lifts to this height first. |
| Reset Distances | Puts every distance back to the defaults shown in the table above. Asks for confirmation first. |
At the Limits
Section titled “At the Limits”Added in 1.1.
Jog moves stop at the axis limits, and the limits include any G-code offset your printer applies, so you cannot jog into a region the firmware would refuse.
- While holding a jog arrow, the repeats simply stop when the axis reaches its limit - no warning pops up.
- A fresh press that can’t move at all shows “X is at its limit (235.00mm)” (with the axis and limit that apply) so you know why nothing happened.
- A press that can only make a partial move does so silently.
The Z buttons behave a little differently: a button that would move past a Z limit is greyed out, so you can see the edge before you press. Which pair greys out depends on what moves in Z on your printer (see below).
Z-Axis Controls
Section titled “Z-Axis Controls”The right column has four Z buttons (two large steps and two small steps, up and down) with a label between them. The label reads Bed on printers whose bed moves up and down (such as the Voron Trident or the Snapmaker U1) and Print Head where the head or gantry moves in Z (bed-slingers, the Voron 2.4, deltas). The arrows show the direction of whatever moves: on a Bed printer the up arrow raises the bed toward the nozzle, and on a Print Head printer it lifts the head away from the bed.
Move Tab
Section titled “Move Tab”Added in 1.1.
The Move tab replaces the jog pad with a 3x3 grid of named bed positions, laid out like the bed seen from above: the Rear row is at the top, the Front row at the bottom, and the columns are Left, Center, and Right. The positions cover the print plate, taken from the probing area in your [bed_mesh] config, not the full axis travel: many printers can travel past the plate to reach a purge bucket, a wiper or parked tools, and a named position never sends the head there. The center position is the middle of the plate; the other eight sit about 10% in from its edges. Printers with no [bed_mesh] section use the axis travel instead. On delta printers the eight outer positions are spread around a circle instead of a rectangle, matching the round bed.
Tap any position and the toolhead moves there in X and Y only - Z is never changed from this grid. If X or Y isn’t homed yet, the printer homes first and then makes the move. The positions and Park grey out while the toolhead is moving and come back once it stops, so a second tap can’t land mid-move; the Z buttons stay live.
Below the grid are two buttons:
- Park - see Park below
- Motors Off - see Motors Off below
Everything on the Move tab is disabled while a print is running or paused, and while the printer isn’t ready.
Bed Tab
Section titled “Bed Tab”Added in 1.1.
The Bed tab shows the print plate from above, rear edge at the top, with a ringed dot where the toolhead is and faint crosshair lines through it, edge to edge. The readout under the plate shows the head’s X, Y and Z. Tap anywhere on the plate and the toolhead goes there in X and Y. Drag and the toolhead follows your finger, while the readout under the plate shows the X and Y beneath it. The head chases the latest point rather than every point it passed, so on a fast drag it moves in short hops and catches up when you stop. A tap or drag past the edge of the plate goes to the nearest point on it; on a delta printer the plate is drawn round and the nearest point is on its rim.
The map is deliberately coarse. For an exact position, tap a coordinate in the header or use the Move tab.
The plate is the same area the Move tab uses: the probing area from your [bed_mesh] config (or the axis travel when there is none), so a tap never sends the head off the plate into a purge bucket or tool dock.
- Z clearance. A move keeps the current Z, unless the nozzle is below the Bed Map Clearance height (Motion Settings, 5 mm by default). Then it first lifts to that height and only then travels, so it never drags across the plate. A drag lifts once, before its first move. The readout warns you before you tap, for example “Z 0.20, will lift to 5mm”.
- Not homed. If any axis is not homed, Z included (the lift needs a known height), the plate greys out and the dot is hidden rather than drawn at a guessed spot. The readout says to home first, and the same home button the jog pad has (a house in a yellow ring) sits in the middle of the plate; tap it to home all axes. Tapping the plate instead homes first and then moves.
- Printing. The Bed tab is disabled while a print is running or paused. The plate also greys out while the toolhead is busy and while the printer isn’t ready.
Added in 1.1.
Park moves the toolhead out of the way to a safe spot.
- If your printer has a parking macro (named
PARK,PARK_TOOLHEAD, orTOOLHEAD_PARK), HelixScreen runs it - including any park height and retract it defines. - If no macro is found, the nozzle lifts 10mm (on a printer whose bed moves in Z, the bed drops 10mm), then the toolhead moves over the rear of the plate, centered side to side and 10mm inside its back edge. It never goes past the plate.
- Any axes that aren’t homed yet are homed first.
You can point the button at a different macro in Settings > Printing > Macro Buttons (the Park row) - see Macro Buttons.
Leveling (QGL / Z-Tilt)
Section titled “Leveling (QGL / Z-Tilt)”If your printer supports it, leveling buttons appear at the bottom of the right column (Jog tab):
- QGL - runs Quad Gantry Level. Shown only on printers configured with
quad_gantry_level(common on Voron 2.x and similar four-Z-motor gantries). Levels the gantry against the bed using the corner probe points. - Z-Tilt - runs Z-Tilt Adjust. Shown only on printers configured with
z_tilt_adjust(common on dual- or triple-Z printers like the Voron Trident). Compensates for tilt between independent Z lead screws.
Tap either button to start the routine. A status message confirms when it begins and when it completes. Both buttons are disabled during an active print and while another leveling or homing operation is already running.
These same buttons are also available on the Controls panel - see Leveling on the Controls Panel below.
Homing
Section titled “Homing”Homing buttons live on the Controls panel (not the Motion screen). The Home row there is a segmented bar:
| Button | Action |
|---|---|
| All | Homes X, Y, and Z |
| X | Homes X only |
| Y | Homes Y only |
| XY | Homes X and Y |
| Z | Homes Z only (requires X/Y homed first on most printers) |
Each segment turns green once that axis is homed and gray when it isn’t. All segments are disabled while a homing or leveling operation is in progress.
A status message confirms when homing begins and when it completes, the same way the leveling buttons do. If the printer connection is down, tapping a segment tells you so rather than doing nothing.
The jog pad’s center home button (on the Motion screen) is a shortcut that homes all axes.
Leveling on the Controls Panel
Section titled “Leveling on the Controls Panel”The Controls panel’s Calibration & Tools card holds the calibration actions your printer supports, in a grid that keeps each label on one line:
- Bed Mesh and Z Calibration
- QGL - Quad Gantry Level (shown only when
quad_gantry_levelis configured) - Z-Tilt - Z-Tilt Adjust (shown only when
z_tilt_adjustis configured) - Tool Offsets - tool changers with the offset calibration macro, while beta features are on
- Pressure Adv. - printers that can measure pressure advance; see Pressure Advance
- Bed Screws - shown only when
screws_tilt_adjustis configured
QGL and Z-Tilt are disabled during an active print and while another operation is running. Motors Off sits beside Motion on the Position card, and the light switch is one of the Quick Actions choices (see Quick Buttons).
Motors Off
Section titled “Motors Off”The Motors Off button appears both on the Move tab and beside Motion on the Controls panel’s Position card. It releases all stepper motors, letting you move the gantry and bed by hand. On the Controls panel the button shows a lit motor icon when steppers are energized and a dimmed one when they’re already off; when the motors are already disabled, the button is greyed out and does nothing.
Tapping it asks for confirmation (“Release all stepper motors. Position will be lost.”) before disabling the steppers. The button is disabled while a print is running or paused - and if a print starts while the confirmation is open, confirming then only tells you “Motors stay on while a print is active” and leaves the motors alone.
Safety note: Releasing the motors drops all holding torque. On a bed-slinger the bed can drop or the gantry can sag under its own weight, and the printer no longer knows its position - you must re-home before printing or jogging. To stop a running print, use the E-Stop or cancel the print, not Motors Off.
Emergency Stop
Section titled “Emergency Stop”The E-Stop button (top-right of the Motion screen header, and on the Controls panel) halts all printer motion immediately, including during a print. By default it asks you to confirm first, so a stray tap can’t stop a print. To make it fire on the first tap, turn off Settings > Safety & Alerts > E-Stop Confirmation.
Next: Filament Management | Prev: Temperature Control | **Back to User Guide](/1.1/guide/)